This past weekend we went back home to get some wedding planning done while Brennan had a free day or two. I pulled the trigger and got my wedding dress! Yay!! So darn excited. :) I think it's going to be perfect for our wedding. Do you know how hard it is to find a dress that doesn't have a princess skirt in the South? I mean seriously, I can't be the only person who doesn't want tulle in their dress? So big spoiler, there's no tulle in my dress! Lol.
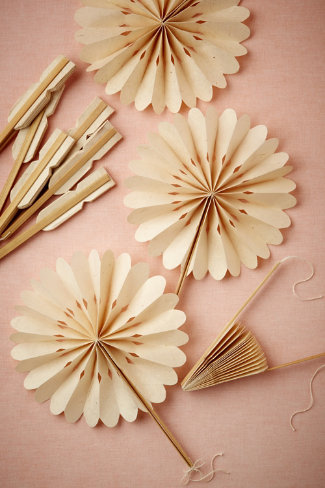
I saw these crinkle fans that would be great for an outdoor wedding, which is coincidentally... what I am having. Granted, my wedding is in November, but it's also the south...so sadly it could be a steamy day. The ones on the bhldn website are $20 for 10. It doesn't seem astronomically expensive but if you have 150 guests, that's $300. And I don't know about you but I'd much rather spend that $300 on something else.
Supplies
-paper
-scissors
-some sort of string ( I used bakers twine)
-sewing needle
-popsicle sticks
-small hole puncher (optional)
I'm apologizing in advance for my backdrop. As soon as I found the fan on bhldn, I grabbed the supplies that were closest to me, and that included Brennan's Gross Anatomy book. That's what happens when you need a sold surface while doing crafts in bed... But probably not the best background for these pictures... Also, ignore my kiddy scissors... Once again, not a well thought out project...
The first step of course is to fold your piece of paper like a fan. I think most of us mastered that skill in Kindergarten, so we should all be pretty set there. :)
Hotdog and Hamburger style both work! lol.

Cut off any excess paper (with your normal sized scissors...)


Depending on how big or small you want your fan to be (the one by bhldn is 4", which is probably a good size to go with), you may be able to cut your paper fan in half (pictures below). I made mine about 7 inches but I definitely recommend a smaller size.

Once you've cut your paper to the desired size and your piece of paper is all folded up, you're going to want to cut the top so it's rounded, like in the image below. I also cut out two triangular shapes a third of the way down. This step is completely customizable and up to you depending on how you want your fan to look once it's unfolded. This is also the step you want to make sure you're using sharp and non kiddie sized scissors for. Otherwise it can be difficult to cut through so many layers of paper.

Since I made my fan folds smaller and longer (7") than the bhldn version, I had to attach a couple different piece of paper together using double sided tape to make sure my fan would open up into a circle. The double sided tape is completely unnoticeable, but glue might also be a good option.

This is the point where I had to do a little revising of my fan plan. At this point, my semblance of a fan was flopping around and no use at all. I needed to add some sort of stability to the bottom of the fan. By punching a hole in the bottom of each fold and stringing some bakers twine through, it gathers everything together and creates a solid base so you can actually move the fan back in forth without it caving in.

I used some sort of jewelry making/bead thing-a-ma-jig to stab holes into each part of my fold. A hole punch would probably be a better choice but like I said, I didn't think this project out too much...lol. No runs to the store for me!

I used a needle and bakers twine to string together the fan and I tied off both ends with a knot. I think the twine that you use would be a really great place to add your wedding colors or just use white to blend in with the fan. My wedding colors are not red and white but once again the bakers twine was easy and accessible :)


Next I glued a popsicle stick to each end. You've got to have something to hold on to! I actually ended overlapping two popsicle sticks on each side because I didn't have any in my craft pile long enough for what I wanted. Once again...if you cut your fans 4" it's a lot easier to find popsicle stick the size your need. (Sorry, I feel like that's my mantra for this entire tutorial...)

The absolute very last thing I did was punch a hole in the bottom of each of the popsicle sticks and thread some bakers twin through. I knotted each side so I could tie the sticks together to hold the fan open.

I asked my fiancée to model the final product for me and this is what he gave me...
It's a pretty attractive pose, don't you think? Leg on the table and all. We're a sexy duo. Lol.

It's a pretty easy tutorial and a lot more cost effective than buying them from bhldn. I think I'm going to remake them in the 4" size and update the tutorial for you guys just so you can see the smaller size.
Right now it's still up in the air whether I'll be using these in my wedding. I'm hoping the weather will cooperate and it will be a beautiful 75 degrees day. :) Fingers perpetually crossed and knocking on wood constantly for the next 10 months!
No comments:
Post a Comment